Heres my second guide for mapping, sorry it's a bit late, but I've had some other stuff to deal with (i don't know if you would want to put it next to the other one in the featured posts section).
You can find the first guide here.
A Guide To Mapping, The Extra Bits
Artillery, UAV and Scan Trailers
Artillery
1. Place down an object spawner in the form of a car (vodnik or DPV)
2. Look in the tweaker bar whilst the car is highlighted and change the "vehicle team 1 and vehicle team 2" fields to:
ars_d30 for the mec/chinese artillery
usart_lw155 for US artillery
3. Scroll down the tweaker bar and check the "teamonvehcile" box.
4. Repeat for how ever many artillery pieces you want.
Remember to make the artillery connect to the right army
UAV and scan
UAV and scan trailers are made exactly the same way as artillery, except you change the feild names next to "vehicle team 1" and "vehicle team 2" to the following names:
aircontroltower = US UAV
aircontroltower_mec = MEC UAV
aircontroltower_chi = Chinese UAV
mobileradar_us_dest = US scan trailer
mobileradar_mec_dest = MEC scan trailer
mobileradar_chi_dest = Chinese scan trailer
Don't forget to check the "teamonvehicle" box.
Water
Water can be quite complicated to make, but these steps will show you how to make decent looking water easily.
Getting Water in Your Map
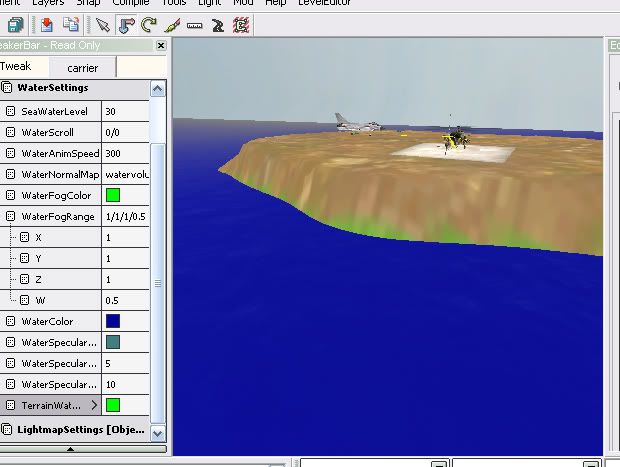
Getting water in your map is extremly easy. First off, you need to open up the water settings in the tweaker box:
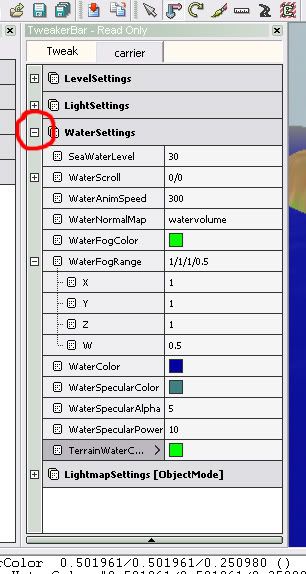
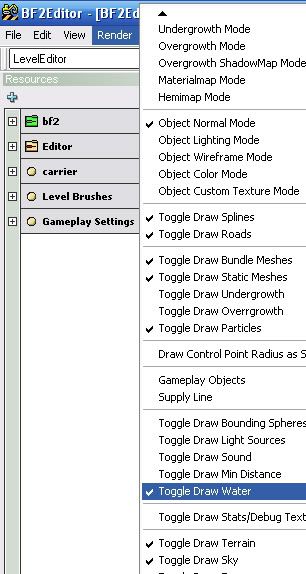
Now, to add water to your map, you'l need to change the value next in the "SeaWaterLevel" field to 30. You should see water apear on your map now, so now adjust this field to whatever number suits the height that you want it. If water didnt show up in your map, make sure it isn't above your camera first (in this case youv gone to high so lower the field digit) and if it isn't up there, then put in a higher number until it shows up. If after many attempts of putting in numbers from 10 - 10,000 and you still don't get water, then make sure that in the "Toggle Draw Water" has a tick next to it:
Water colouring should really depend on your map, if you have a gloomy map like Songhua, you should have water like that in Songhua. If you have a bright and sunny map like Wake, you should have water like that in Wake. You can directly copy water from an original map quite easily, its just a case of copying files:
1. Open up your C:\Program Files\EA GAMES\Battlefield 2\mods\bf2\Levels directory and locate the level of whos water you would like to copy. I'll use Wake for example.
2. Open up Wake's folder, and look in the .zip file named "Client.zip".
3. Extract the water folder, and then copy this folder and paste it into your map's level folder.
4. Open the editor and load up your map.
5. In the leveleditor, use the far left window to find the item under this directory: "Editor > bf2editor > content > objects > common" and place the item "defaultenvmap" into your map. Place it into the middle area, over some water and raise it so its about 50m over sea level.
6. Go to "Compile > Envmaps > Generate Envmaps"
7. Save.
This is probablt the best way to set water calouring in your map, as the vanilla ones are quite good.
Water Movement
Water movement can be played about with in the tweaker bar, under the "your level" tab. Click the water settings bit, and start to change some of the fields:
Water Scroll (X and Y)
These two fields determine the direction in which the water scrolls. You will not see any difference in scrolling until you have changed the field next to "WaterAnimSpeed". The lower the numbers, the slower the water moves, and the higher the faster. a good setting is "0.5, 1". The direction can be changed by changing these values to a "-":
0.5, 1 = South westerly moving sea
0.5, -1 = North westerly moving sea
-0.5, -1 = North easterly moving sea
-0.5, 1 = South easterly moving sea
Like i said, play about with these a bit until you find one that is right for your map.
WaterAnimSpeed
This field determines the speed of the "ripples" or whatever you wnt to call them. The higher the number, the slower the water will move, and the lower the faster. The standard number to use is between 300-500. the lower this is, the more effective water scroll you have.
WaterNormalMap
Dunno what the hell this is, so I'd just leave it.
WaterFogColour
This just changes the colour of the fog that is visibleon your water at a distance. Best to have something that will be like your normal fog colour, maybe a bit blue-ier (?).
WaterFogRange
It's best to just change the X and Y settings in this field, as i don't really know what the others do <: D
WaterColour and WaterSpecularColour
These two colours will determine the colour of the water. If you have copied another level's water, then you don't need to change these settings. The first one will be the base colour, and the second one is the colour of the water highlights.
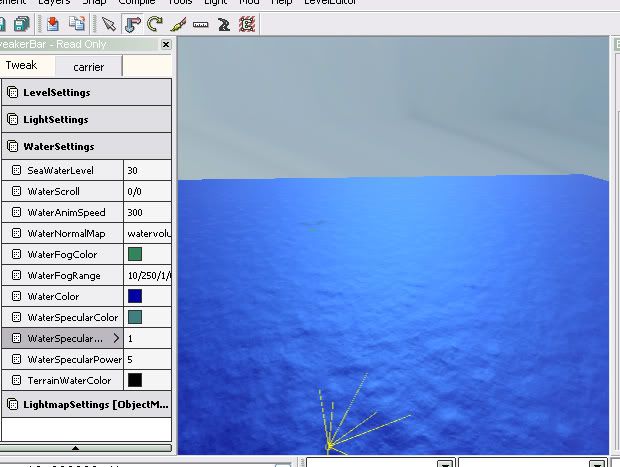
WaterSpecularAlpha and WaterSpecularPower
Again, if you copied another levels water, then don't change these settings. They determine the amount of colour in your water, based from the colours given in the above two fields. The top one is the "brightness" changer in a way. If you have a sunny map, then have this one at about 5 or something, to reflect the suns intensity. The one below is the normal waters colour power. A good setting is maybe "2, 10" for these.
Here is an example at "1, 5":
And here's one at "5, 10":
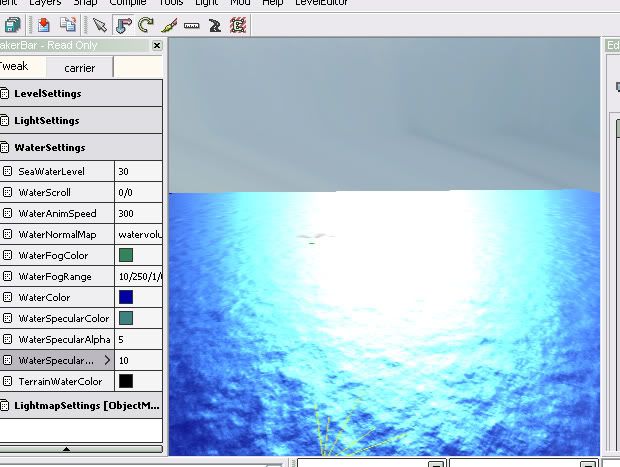
quite a noticable difference. Remember, you can also go into decimal numbers for precise colouring.
TerrianWaterColour
This effects the colour of your terrain where your water meets it. Its best to have it at about a sandy colour, or just whatever colour you terrain is.
Here's a picture to show you the where the colour effects the terrain (i coloured it green to highlight it more):
You should now have water sorted.
Level Settings
This can be found here:
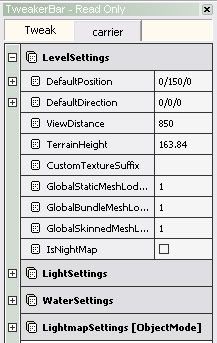
The only thing you will need to change in here is "IsNightMap". Toggle it to whether your map is or isn't a night map.
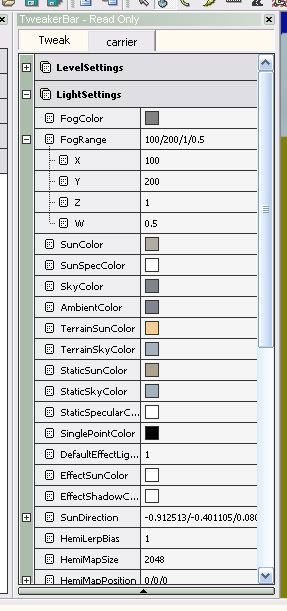
Light Settings
The light settings change things like your sky texture, cloud textures, cloud movement and fog. The level settings tweaker box can be located here:
FogColour and FogRange
The first field simply changes the colour of your fog. It's best to have a colour that suits your sky and your terrain. If you have a bright blue sky, and a nice grassy terrain, then you would want a fog that is a very light blue to match your sky. If you have a desert type terran going, and a really dim sky, then make the fog match the terrain, to make it like a type of "sandstorm" in the background. Just choose a colour that suits your map well.
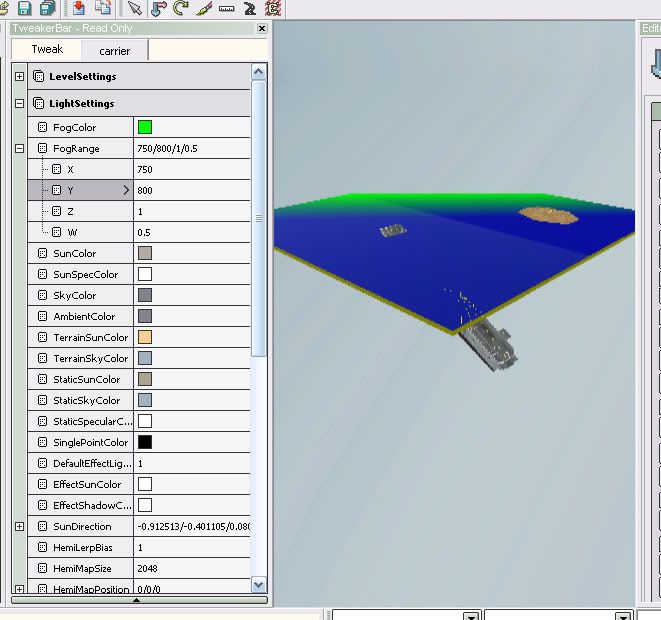
FogRange determines the range of your fog. It's best to have fog in your map, even on a map with where you don't want any fog, as you cna only see a certain distance ingame, and if there is no fog, this deadzone will look all sharp and crap. Fog will neaten this up nicely. If you want to know how far the game will let you see, then check this option:
Now move your camera back until you start to see your terrain disappear. "X = 750" should be enough to just come in before the deadzone.
Remember, "Y" will always have to be higher than "X", otherwise you will have fog inverted. Here is a picture to show you my "X and Y" and the distance it goes to before the level view ends:
SunColour - EffectShadowColour
These colour settings are best left at default, but can be played around with to make up some pretty cool results. Like one of them changes the smoke behind things like rockets, so it's pretty cool setting it to black or red and then flying in a cobra shooting stuff If you have a night map going on, then maybe darken some of these colours, but i wouldn't mess around with them if you are keeping your map realistic.
"DefaultEffectLightAffectionFactor"... wtf? I dunno what this is, I would just leave it as it is...
All the Other Fields In Here...
Ok, I'll list the ones that i know that do something, all the others I would just leave alone.
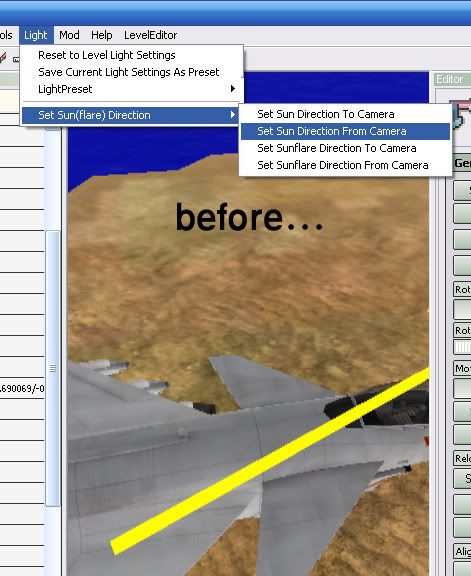
SunDirection
Don't be a fool and play about with these numbers to get the right direction, do it the easy way:
1. Point the camera the way you want the sun direction to be
2. Now follow the pictures:
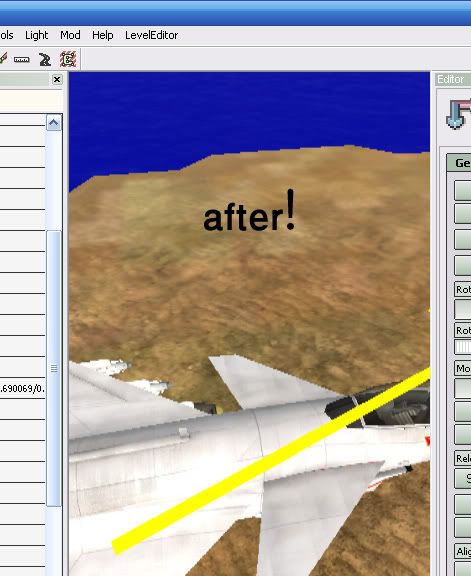
Sorted!
Don't mess about with anything else in "Light" just yet.
SunisEnabled
Check this if you have a day map. If you have a night map, un-check it.
SkyRotation
This should be at 0 by default, and everytime you put in a number, the sky will rotate. If your being a perfectionist, or your sun is in the wrong place, then use this to move it around.
HasCloudLayer - CloudTexture2
These 6 fields gie you the option of adding clouds to your map. It would be best first of all to do your sky texture first of all, so skip down to the next bit and then come back.
Ok, so your back then. After you have done your sky texture, select the box next to "HasCloudLayer". Now go to "CloudTexture and select the the look of your clouds. Now, go up to "ScrollDirection" and change the values in "X and Y" to make your clouds move in the direction you desire (this is just like the water scrolling). "HasCloudTexture2" will just add another layer of clouds to your map if you want one.
SkyTexture
This field just gives you the option of changing the sky texture. Simple. Pick a nice one
I wouldn't mess with the rest, flare direction and all that ain't too great, it makes your map look like it has two suns, and the flare shows through objects, so it ain't that realistic.
LightMaps
LightMaps are the things that set up shadows in your map. Now, I'm not too sure on how it all works, but the way i set them up always works for me. LightMaps also make your water clear, so they're a must if you are making an attractive map.
Note, you should only do LightMaps after you have done everything else in your map as adjusting something afterwards will result in you having to compile the LightMaps again.
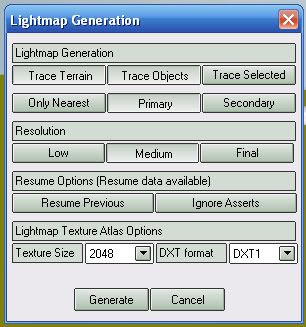
So, lets say we have a fully complete map, and we are ready to set our Lightmaps. To do so, follow the following steps in order:
1. Go to "Compile > LightMaps > Generate LightMaps"
2. Select "Trace Terrain", "Trace Objects" and "Primary" in the LightMap Generation.
3. Select "Medium" (or whatever you want it to be, the higher tho the longer it will take. I've heard of some peoples lightmaps taking up to 7 hours to compile) in Resolution.
4. Leave all other boxes as they were.
5. Mine looks like this:
6. Now click generate and wait for them to compile. You may be asked at the end if you want to check for obsolete LightMaps or sumething like that, just click yes or no, it doesn't matter.
The Mini Map
Ahh, the mini map. So annoying...
Note, you should only do the mini map after you have done everything else in your map as if you adjust anything afterwards you will have to do this all over again, and you wouldn't want to do that.
[b]FIRST OFF! GO HERE TO GET THE PLUGIN FOR PHOTOSHOP (YOU MUST HAVE PHOTOSHOP OR SOME OTHER IMAGE EDITING SOFTWARE. NOT PAINT) THAT ALLOWS YOU TO OPEN AND SAVE .DDS FILES.
I'll do a step by step guide for this:
1. Do this:
2. A minimap should now appear in your map window. Save and close the editor.
3. Open up this diectory: C:\Program Files\EA GAMES\Battlefield 2\mods\bf2\Levels\[Your Level]\Editor and then open up the .dds file in there called minimap.
4. Resize it to 512x512 and save it as ingameMap.dds in the following directory: C:\Program Files\EA GAMES\Battlefield 2\mods\bf2\Levels\carrier\Hud\Minimap
Just over-write the old one.
Now that is your basic mini-map done (the one that shows up ingame), now to do the ones that show up whilst the level is loading.
You will want to make an effective picture of your map like this:
To do this, you will need:
this PSD file
Photoshop or another program like it to edit the psd file
Your Minimap.dds file
Now, open up the PSD i gave you. In there, is my map picture to give you a size idea, a smaller version of my map on it (for the bottom right hand corner bit) and the flag bits (MEC, USMC and Neatral).
Replace my map with your one, and duplicate the layers with the flag bits on and place them around your map in the correct places. Then replace the smaller map of mine with your one, and you should be all sorted! Now, save it as three different files in this directory: C:\Program Files\EA GAMES\Battlefield 2\mods\bf2\Levels\[Your Level]\Info
Call them (without quotation marks) "gpm_cq_16_menuMap.png", "gpm_cq_32_menuMap.png" and "gpm_cq_64_menuMap.png".
I'm not too sure myself on how to do the whole 16, 32 and 64 sizes for each map, so just do it that way for now and i'll tell you when i know myself
Well, thats the second guide. If i have missed something (which i probably have) then I'l post it in later on in here for you all!
The next guide will be the final one and will include all the expert tips that can make make your map even better!
You can find the first guide here.
A Guide To Mapping, The Extra Bits
Artillery, UAV and Scan Trailers
Artillery
1. Place down an object spawner in the form of a car (vodnik or DPV)
2. Look in the tweaker bar whilst the car is highlighted and change the "vehicle team 1 and vehicle team 2" fields to:
ars_d30 for the mec/chinese artillery
usart_lw155 for US artillery
3. Scroll down the tweaker bar and check the "teamonvehcile" box.
4. Repeat for how ever many artillery pieces you want.
Remember to make the artillery connect to the right army
UAV and scan
UAV and scan trailers are made exactly the same way as artillery, except you change the feild names next to "vehicle team 1" and "vehicle team 2" to the following names:
aircontroltower = US UAV
aircontroltower_mec = MEC UAV
aircontroltower_chi = Chinese UAV
mobileradar_us_dest = US scan trailer
mobileradar_mec_dest = MEC scan trailer
mobileradar_chi_dest = Chinese scan trailer
Don't forget to check the "teamonvehicle" box.
Water
Water can be quite complicated to make, but these steps will show you how to make decent looking water easily.
Getting Water in Your Map
Getting water in your map is extremly easy. First off, you need to open up the water settings in the tweaker box:
Now, to add water to your map, you'l need to change the value next in the "SeaWaterLevel" field to 30. You should see water apear on your map now, so now adjust this field to whatever number suits the height that you want it. If water didnt show up in your map, make sure it isn't above your camera first (in this case youv gone to high so lower the field digit) and if it isn't up there, then put in a higher number until it shows up. If after many attempts of putting in numbers from 10 - 10,000 and you still don't get water, then make sure that in the "Toggle Draw Water" has a tick next to it:
Water colouring should really depend on your map, if you have a gloomy map like Songhua, you should have water like that in Songhua. If you have a bright and sunny map like Wake, you should have water like that in Wake. You can directly copy water from an original map quite easily, its just a case of copying files:
1. Open up your C:\Program Files\EA GAMES\Battlefield 2\mods\bf2\Levels directory and locate the level of whos water you would like to copy. I'll use Wake for example.
2. Open up Wake's folder, and look in the .zip file named "Client.zip".
3. Extract the water folder, and then copy this folder and paste it into your map's level folder.
4. Open the editor and load up your map.
5. In the leveleditor, use the far left window to find the item under this directory: "Editor > bf2editor > content > objects > common" and place the item "defaultenvmap" into your map. Place it into the middle area, over some water and raise it so its about 50m over sea level.
6. Go to "Compile > Envmaps > Generate Envmaps"
7. Save.
This is probablt the best way to set water calouring in your map, as the vanilla ones are quite good.
Water Movement
Water movement can be played about with in the tweaker bar, under the "your level" tab. Click the water settings bit, and start to change some of the fields:
Water Scroll (X and Y)
These two fields determine the direction in which the water scrolls. You will not see any difference in scrolling until you have changed the field next to "WaterAnimSpeed". The lower the numbers, the slower the water moves, and the higher the faster. a good setting is "0.5, 1". The direction can be changed by changing these values to a "-":
0.5, 1 = South westerly moving sea
0.5, -1 = North westerly moving sea
-0.5, -1 = North easterly moving sea
-0.5, 1 = South easterly moving sea
Like i said, play about with these a bit until you find one that is right for your map.
WaterAnimSpeed
This field determines the speed of the "ripples" or whatever you wnt to call them. The higher the number, the slower the water will move, and the lower the faster. The standard number to use is between 300-500. the lower this is, the more effective water scroll you have.
WaterNormalMap
Dunno what the hell this is, so I'd just leave it.
WaterFogColour
This just changes the colour of the fog that is visibleon your water at a distance. Best to have something that will be like your normal fog colour, maybe a bit blue-ier (?).
WaterFogRange
It's best to just change the X and Y settings in this field, as i don't really know what the others do <: D
WaterColour and WaterSpecularColour
These two colours will determine the colour of the water. If you have copied another level's water, then you don't need to change these settings. The first one will be the base colour, and the second one is the colour of the water highlights.
WaterSpecularAlpha and WaterSpecularPower
Again, if you copied another levels water, then don't change these settings. They determine the amount of colour in your water, based from the colours given in the above two fields. The top one is the "brightness" changer in a way. If you have a sunny map, then have this one at about 5 or something, to reflect the suns intensity. The one below is the normal waters colour power. A good setting is maybe "2, 10" for these.
Here is an example at "1, 5":
And here's one at "5, 10":
quite a noticable difference. Remember, you can also go into decimal numbers for precise colouring.
TerrianWaterColour
This effects the colour of your terrain where your water meets it. Its best to have it at about a sandy colour, or just whatever colour you terrain is.
Here's a picture to show you the where the colour effects the terrain (i coloured it green to highlight it more):
You should now have water sorted.
Level Settings
This can be found here:
The only thing you will need to change in here is "IsNightMap". Toggle it to whether your map is or isn't a night map.
Light Settings
The light settings change things like your sky texture, cloud textures, cloud movement and fog. The level settings tweaker box can be located here:
FogColour and FogRange
The first field simply changes the colour of your fog. It's best to have a colour that suits your sky and your terrain. If you have a bright blue sky, and a nice grassy terrain, then you would want a fog that is a very light blue to match your sky. If you have a desert type terran going, and a really dim sky, then make the fog match the terrain, to make it like a type of "sandstorm" in the background. Just choose a colour that suits your map well.
FogRange determines the range of your fog. It's best to have fog in your map, even on a map with where you don't want any fog, as you cna only see a certain distance ingame, and if there is no fog, this deadzone will look all sharp and crap. Fog will neaten this up nicely. If you want to know how far the game will let you see, then check this option:
Now move your camera back until you start to see your terrain disappear. "X = 750" should be enough to just come in before the deadzone.
Remember, "Y" will always have to be higher than "X", otherwise you will have fog inverted. Here is a picture to show you my "X and Y" and the distance it goes to before the level view ends:
SunColour - EffectShadowColour
These colour settings are best left at default, but can be played around with to make up some pretty cool results. Like one of them changes the smoke behind things like rockets, so it's pretty cool setting it to black or red and then flying in a cobra shooting stuff If you have a night map going on, then maybe darken some of these colours, but i wouldn't mess around with them if you are keeping your map realistic.
"DefaultEffectLightAffectionFactor"... wtf? I dunno what this is, I would just leave it as it is...
All the Other Fields In Here...
Ok, I'll list the ones that i know that do something, all the others I would just leave alone.
SunDirection
Don't be a fool and play about with these numbers to get the right direction, do it the easy way:
1. Point the camera the way you want the sun direction to be
2. Now follow the pictures:
Sorted!
Don't mess about with anything else in "Light" just yet.
SunisEnabled
Check this if you have a day map. If you have a night map, un-check it.
SkyRotation
This should be at 0 by default, and everytime you put in a number, the sky will rotate. If your being a perfectionist, or your sun is in the wrong place, then use this to move it around.
HasCloudLayer - CloudTexture2
These 6 fields gie you the option of adding clouds to your map. It would be best first of all to do your sky texture first of all, so skip down to the next bit and then come back.
Ok, so your back then. After you have done your sky texture, select the box next to "HasCloudLayer". Now go to "CloudTexture and select the the look of your clouds. Now, go up to "ScrollDirection" and change the values in "X and Y" to make your clouds move in the direction you desire (this is just like the water scrolling). "HasCloudTexture2" will just add another layer of clouds to your map if you want one.
SkyTexture
This field just gives you the option of changing the sky texture. Simple. Pick a nice one
I wouldn't mess with the rest, flare direction and all that ain't too great, it makes your map look like it has two suns, and the flare shows through objects, so it ain't that realistic.
LightMaps
LightMaps are the things that set up shadows in your map. Now, I'm not too sure on how it all works, but the way i set them up always works for me. LightMaps also make your water clear, so they're a must if you are making an attractive map.
Note, you should only do LightMaps after you have done everything else in your map as adjusting something afterwards will result in you having to compile the LightMaps again.
So, lets say we have a fully complete map, and we are ready to set our Lightmaps. To do so, follow the following steps in order:
1. Go to "Compile > LightMaps > Generate LightMaps"
2. Select "Trace Terrain", "Trace Objects" and "Primary" in the LightMap Generation.
3. Select "Medium" (or whatever you want it to be, the higher tho the longer it will take. I've heard of some peoples lightmaps taking up to 7 hours to compile) in Resolution.
4. Leave all other boxes as they were.
5. Mine looks like this:
6. Now click generate and wait for them to compile. You may be asked at the end if you want to check for obsolete LightMaps or sumething like that, just click yes or no, it doesn't matter.
The Mini Map
Ahh, the mini map. So annoying...
Note, you should only do the mini map after you have done everything else in your map as if you adjust anything afterwards you will have to do this all over again, and you wouldn't want to do that.
[b]FIRST OFF! GO HERE TO GET THE PLUGIN FOR PHOTOSHOP (YOU MUST HAVE PHOTOSHOP OR SOME OTHER IMAGE EDITING SOFTWARE. NOT PAINT) THAT ALLOWS YOU TO OPEN AND SAVE .DDS FILES.
I'll do a step by step guide for this:
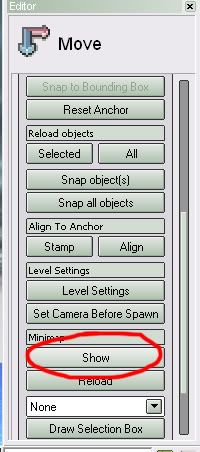
1. Do this:
2. A minimap should now appear in your map window. Save and close the editor.
3. Open up this diectory: C:\Program Files\EA GAMES\Battlefield 2\mods\bf2\Levels\[Your Level]\Editor and then open up the .dds file in there called minimap.
4. Resize it to 512x512 and save it as ingameMap.dds in the following directory: C:\Program Files\EA GAMES\Battlefield 2\mods\bf2\Levels\carrier\Hud\Minimap
Just over-write the old one.
Now that is your basic mini-map done (the one that shows up ingame), now to do the ones that show up whilst the level is loading.
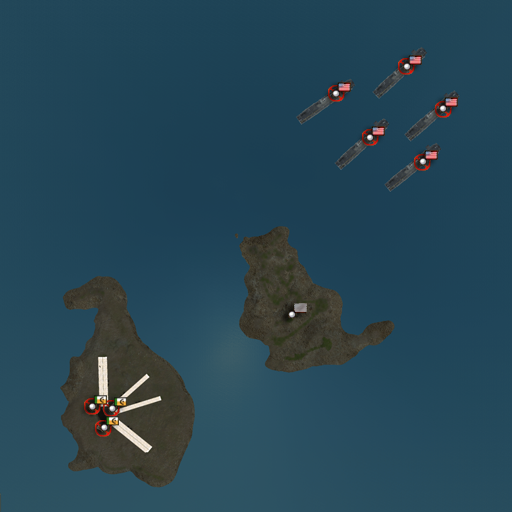
You will want to make an effective picture of your map like this:
To do this, you will need:
this PSD file
Photoshop or another program like it to edit the psd file
Your Minimap.dds file
Now, open up the PSD i gave you. In there, is my map picture to give you a size idea, a smaller version of my map on it (for the bottom right hand corner bit) and the flag bits (MEC, USMC and Neatral).
Replace my map with your one, and duplicate the layers with the flag bits on and place them around your map in the correct places. Then replace the smaller map of mine with your one, and you should be all sorted! Now, save it as three different files in this directory: C:\Program Files\EA GAMES\Battlefield 2\mods\bf2\Levels\[Your Level]\Info
Call them (without quotation marks) "gpm_cq_16_menuMap.png", "gpm_cq_32_menuMap.png" and "gpm_cq_64_menuMap.png".
I'm not too sure myself on how to do the whole 16, 32 and 64 sizes for each map, so just do it that way for now and i'll tell you when i know myself
Well, thats the second guide. If i have missed something (which i probably have) then I'l post it in later on in here for you all!
The next guide will be the final one and will include all the expert tips that can make make your map even better!