I've seen alot of posts about how people would like to know how to map and that and trust me, its great, so i decided to make this for you all.
A Basic Guide To Mapping
Getting The Editor
The editor can be found at any of the following sites:
EA
FileFront
FileCloud
If you get it from anywhere else, make sure it's the latest editor, v2, which was brought out in 2006.
Using The Editor
After installing it and everything (which should be an easy enough job), load it up. After a few seconds of loading, you should get a pop-up like this:

This box should show all of the mods that are in your Mods folder, in your Battlefield 2 directory.
Now, we want to click "bf2", so click it and wait until everything has finished loading (you may get a pop-up about there not being any add-ons or something, just click yes or ok).
The bottom window of the editor is called the Output Window, alot of stuff in there may scare you, as of all the errors and that it says, but just ignore it.
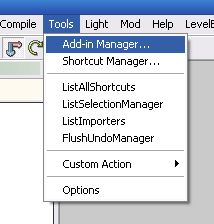
As this may be the first time you are using the editor, you will want to make sure everything is loaded up (even if this isn't the first time, i suggest doing it just incase). To do this, we need to go to "Tools > Add-in manager..."
In the window that comes up, click on the small plus sign on the far left of “Import”. Then check the boxes to the right of “autoload” and “Loaded” if they are not already checked. Then do the same for LevelEditor, ObjectEditor, and TerrainEditor.
You can then choose what way you want the editor to start up in, next to start-up editor (I use LevelEditor).
Making Your Terrain
Load up the TerrainEditor first of all by using the drop down box in the top left of the editor. Now go to "File > New" and click it. You should now get up a box that looks like this:
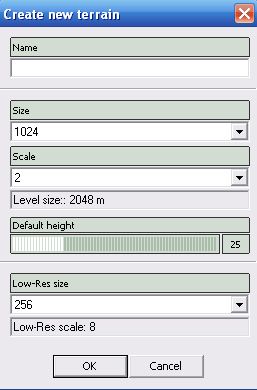
Fill in a name, for example, MEC_Invasion (spaces aint alowd) or summut. The box below, "Size" will determine the size of your map. 1024 is big, like Zatar and Wake big (used for maps with planes and the such).
~
WARNING! (we had to have one somewhere)
The bigger the map, the more power it will need to run it in the editor. My pc is 1gb RAM, ATI Radeon 9550, 3.2ghz Intel Pentium 4 (2 CPUs) and it can just run a 1024 size map on a scale of 2 if i turn of all the random processes in task manager.
~
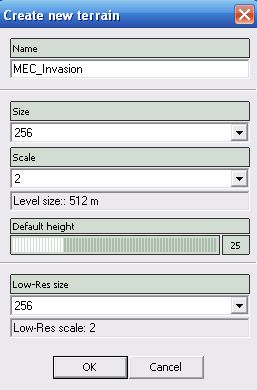
We will make ours 256 on a scale of 2, making our level size 512, our height at 25 and the low-res scale at 256. Your box should now look like this:
Now click ok!
And now we wait, possibly whilst listening to some music ("Pump It" atm for me).
When it is loaded, you will be greeted by your map, in all its default glory. you'l probably want to move around it a bit, so heres the controls:
Controls
"WASD": moves you around, much like a soldier in BF2.
"Mouse Button 2" AKA "Middle Mouse Button" AKA Scroll "Wheel Button": Hold this down to turn on the spot.
Combine these two and itl be just like your controlling a superman accross your map.
"The Scroll Wheel": Aswell as pressig it, scrolling it backwards and forwards will decrease/increase the speed in which your superman moves. you can check this speed at the bottom of the editor (spd: 100% by default. 1500% is the highest, 5% is the lowest).
"Space Bar": this allows you to switch to free camera mode and editor mode. free camera is exactly what it says on the tin, and editor mode is where your cursor changes to show you the radius of your selected brush.
"CTRL": takes the camera directly down.
i think thats all the controls i use. If you ever find yourself with no cursor, just press ESC. it will bring you back to the default camera/cursor state.
Now, back to editing. first things first, go to "Render > Detail Texture mode" so we can see what we are painting. Now clk the brush tool which is right from the editor drop down box at the top. then, in the resources box, click layer 1:
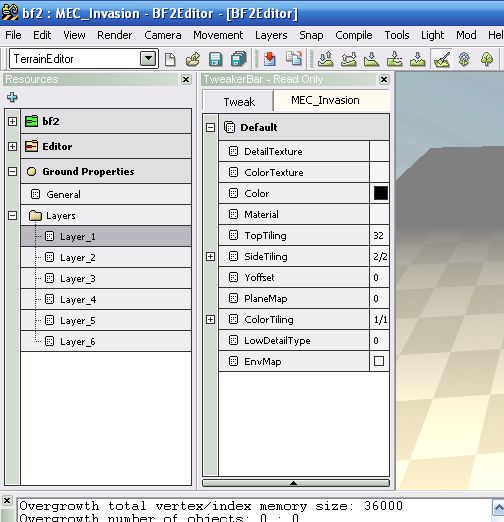
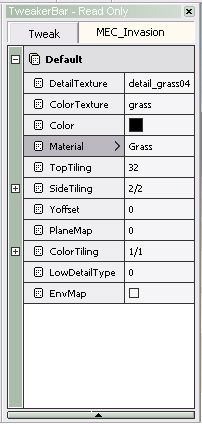
The big box next to the resources box is the tweaker box. here, we will set up our brush. Make it look like this for starters, we'l put some grass down:
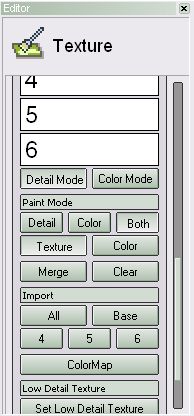
Go on over to the other side of the editor to the editor box. the brush size bar determines the brush size, same with the strength. put em all on max for the first layer of painting. scroll down a bit afterwards and arrange the below buttons to look like this:
(thats detail, both and texture pressed in)
Now, start painting!
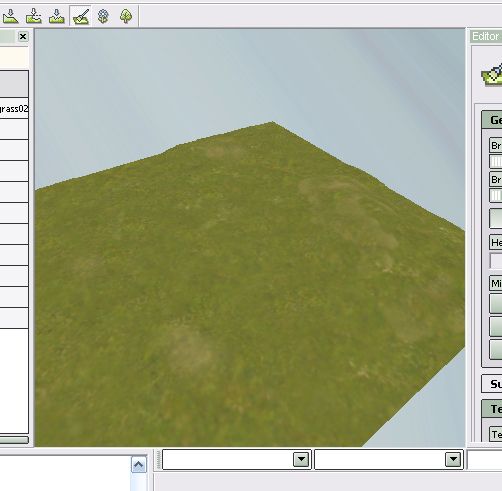
paint all over your map until its covered in grass (if the fog is in your way, go to "render > draw fog" and click it off to turn it off) (If you get a pop-up about height maps, click no for now) and it should look like this:

Now, its looking a bit flat, so lets add some elevation. Out of these icons: click the first one from the left, and put down the brush size and strength to half way.
Start putting in some hills here and there to make it look a bit more realistic.
Play about with the paint brush and paint the hills a bit of a different colour, to make it look more prettier. When you want to paint a different colour, remember to select a different layer, otherwise you will delete the other. Also remember to press in the button "both" in the editor bar. Make it look like so:
It would be a great idea to save now, so il tell you how. There is a floppy disc icon near the top, click it to save what you have done in this editor type. the one with three floppy discs saves what you have done altogether. After clicking it, just cick ok on the next box.
~
WARNING!
NEVER check all of the boxes in the save menu, as it will screw up your map (unless told otherwise). The ones already selected are the ones that you have made changes to, so you shouldn't need to check any more boxes.
~
Now, its time to add statics (objects) to our map!
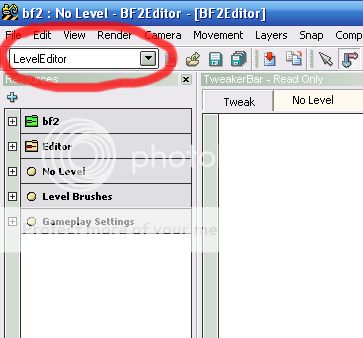
Using The Level Editor
Using the drop down box, select LevelEditor. First things first, is loading the content. Go to "Mod > Mod Manager..." and click the editor content tab at the top. check ALL the boxes on this page, to look like this:
Click ok when they are all selected, and wait for it to load them all.
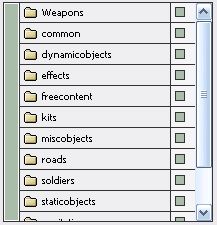
Next is the scenery, the buildings etc. In the resources window, open up bf2 tree and select the following:
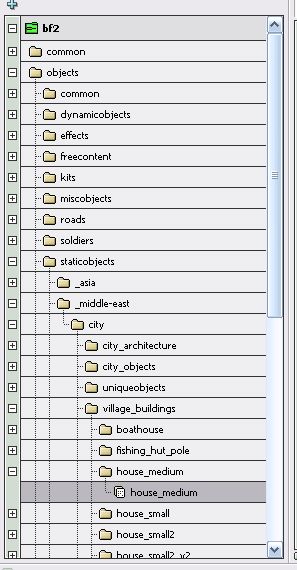
Then drag this into your map, and it should place a building into it (if the building is only visible at certain angles from the camera, save and close the editor, then reload it all again as it will sometimes do this after you have just painted onto it). Move the building to where you want it to go, using these two tools: . they are simple enough to use, one moves the object selected, the other rotates it (a tip with the rotating tool, to rotate something exactly 90 degrees, right clk the circle). Continue to place down items from the bf2 objects tree into your map, until you have something you like.
Now we will want to add some control points. Select the move tool and right click on to your map and select create control point. Name it, and create another two around your map (ignore the teams at the moment, we'l get back to that). Move them to the right places, and select the one you want as a neutral. Look in the tweaker bar, and change the value in team to 0. chnge the third CP to team 2 aswell. Now change the radius values to fit how you want them, i usually stick around 7-15.
Here is mine so far...

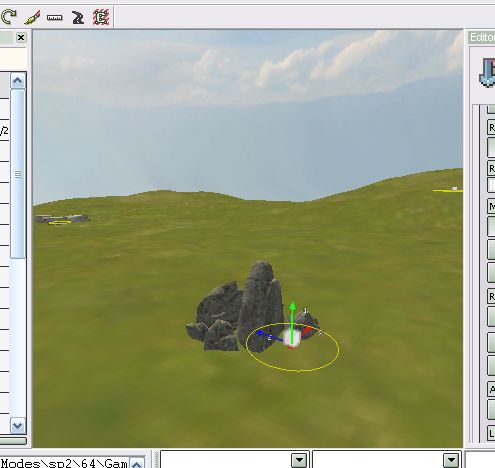
It aint that great, as i have just made it quickly.
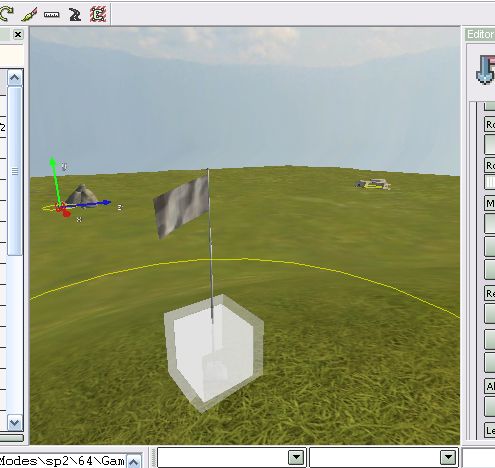
Now, spawn points. These are simply made by right clicking near your chosen CP and clickng create spawn point. There is no need to name them really, just stick with the default name.
Now we have objects, CP's and spawn points! Next, vehicles. Create these by using the same method as createing a spawn point, right click and click create object spawner. You then get a list of all vehicles and such in the game that you put in, so select one, making sure that the army names before it are the armies that you want in your map. we will use "ME_US_Heavy_Jeep". The object will then show up, but it will be the wrong type for the CP (a vodnik will show up for a US flag) but dont worry, it wont look like this ingame. Place it in the right position, and place anymore if you want them.
Our map should now be basically completed!
If you would like to test it out, go ahead, but do these first:
1. Close the editor and open up this directory: C:\Program Files\EA GAMES\Battlefield 2\mods\bf2\Levels
2. Right click your level and go to properties
3. Un-check the read-only attribute, and apply it to all sub folders and files.
4. Click ok
5. Open the editor back up and load your map in the terrain editor
6. Activate all the heightmaps via trying to paint over the edges. There should eight altogther.
7. Go to "render > surrounding terrain > toggle draw all" and 8 squares should now be surounding your map. You can choose to paint these, or just lower them into the ground, and set a water level (set a water level by clicking the "your level" tab in the tweaker and clicking water settings. then change the water level) to cover em up.
8. Now click save, and make sure the "compiled detail and colour textures" box is checked.
9. Now click yes.
Now, to the right of the editor, find the button called "level settings". Press it to open up a box, and in the drop down box, change it to the right army (chinese or mec) that you want for your map. If you change it to MEC, you have to manually change the flag name to "flag_mec" (without quotations). Now click ok and save.
Now you should have completed your map 0.1, so go into terrain editor mode and go to "Terrain Editor > setLowDetailTexture". A box should show up now, and you must select defaultLowDetail.dds and click ok. Now save and get testing!
To test your map, open BF2, log in, click the multiplayer tab, and go to "create local". select your map,a nd click start server to bgin testing it.
If you followed this guide exactly, you should have now created a basic map, pat yourself on the back!
Stay tuned for my next guide, "Mapping, The Extra Bits" which will include stuff like minimaps, level settings, and other stuff.
After that i will make another guide called "Mapping, Revenge Of The Sith: Expert tips".
Thanks for reading!
*EDIT*
If anyone has any questions concerned with mapping, PM me or just reply here and il help you out as best as i can.
*EDIT*
the next guide in the series: http://forums.bf2s.com/viewtopic.php?id=37981
A Basic Guide To Mapping
Getting The Editor
The editor can be found at any of the following sites:
EA
FileFront
FileCloud
If you get it from anywhere else, make sure it's the latest editor, v2, which was brought out in 2006.
Using The Editor
After installing it and everything (which should be an easy enough job), load it up. After a few seconds of loading, you should get a pop-up like this:
This box should show all of the mods that are in your Mods folder, in your Battlefield 2 directory.
Now, we want to click "bf2", so click it and wait until everything has finished loading (you may get a pop-up about there not being any add-ons or something, just click yes or ok).
The bottom window of the editor is called the Output Window, alot of stuff in there may scare you, as of all the errors and that it says, but just ignore it.
As this may be the first time you are using the editor, you will want to make sure everything is loaded up (even if this isn't the first time, i suggest doing it just incase). To do this, we need to go to "Tools > Add-in manager..."
In the window that comes up, click on the small plus sign on the far left of “Import”. Then check the boxes to the right of “autoload” and “Loaded” if they are not already checked. Then do the same for LevelEditor, ObjectEditor, and TerrainEditor.
You can then choose what way you want the editor to start up in, next to start-up editor (I use LevelEditor).
Making Your Terrain
Load up the TerrainEditor first of all by using the drop down box in the top left of the editor. Now go to "File > New" and click it. You should now get up a box that looks like this:
Fill in a name, for example, MEC_Invasion (spaces aint alowd) or summut. The box below, "Size" will determine the size of your map. 1024 is big, like Zatar and Wake big (used for maps with planes and the such).
~
WARNING! (we had to have one somewhere)
The bigger the map, the more power it will need to run it in the editor. My pc is 1gb RAM, ATI Radeon 9550, 3.2ghz Intel Pentium 4 (2 CPUs) and it can just run a 1024 size map on a scale of 2 if i turn of all the random processes in task manager.
~
We will make ours 256 on a scale of 2, making our level size 512, our height at 25 and the low-res scale at 256. Your box should now look like this:
Now click ok!
And now we wait, possibly whilst listening to some music ("Pump It" atm for me).
When it is loaded, you will be greeted by your map, in all its default glory. you'l probably want to move around it a bit, so heres the controls:
Controls
"WASD": moves you around, much like a soldier in BF2.
"Mouse Button 2" AKA "Middle Mouse Button" AKA Scroll "Wheel Button": Hold this down to turn on the spot.
Combine these two and itl be just like your controlling a superman accross your map.
"The Scroll Wheel": Aswell as pressig it, scrolling it backwards and forwards will decrease/increase the speed in which your superman moves. you can check this speed at the bottom of the editor (spd: 100% by default. 1500% is the highest, 5% is the lowest).
"Space Bar": this allows you to switch to free camera mode and editor mode. free camera is exactly what it says on the tin, and editor mode is where your cursor changes to show you the radius of your selected brush.
"CTRL": takes the camera directly down.
i think thats all the controls i use. If you ever find yourself with no cursor, just press ESC. it will bring you back to the default camera/cursor state.
Now, back to editing. first things first, go to "Render > Detail Texture mode" so we can see what we are painting. Now clk the brush tool which is right from the editor drop down box at the top. then, in the resources box, click layer 1:
The big box next to the resources box is the tweaker box. here, we will set up our brush. Make it look like this for starters, we'l put some grass down:
Go on over to the other side of the editor to the editor box. the brush size bar determines the brush size, same with the strength. put em all on max for the first layer of painting. scroll down a bit afterwards and arrange the below buttons to look like this:
(thats detail, both and texture pressed in)
Now, start painting!
paint all over your map until its covered in grass (if the fog is in your way, go to "render > draw fog" and click it off to turn it off) (If you get a pop-up about height maps, click no for now) and it should look like this:
Now, its looking a bit flat, so lets add some elevation. Out of these icons:
click the first one from the left, and put down the brush size and strength to half way.Start putting in some hills here and there to make it look a bit more realistic.
Play about with the paint brush and paint the hills a bit of a different colour, to make it look more prettier. When you want to paint a different colour, remember to select a different layer, otherwise you will delete the other. Also remember to press in the button "both" in the editor bar. Make it look like so:
It would be a great idea to save now, so il tell you how. There is a floppy disc icon near the top, click it to save what you have done in this editor type. the one with three floppy discs saves what you have done altogether. After clicking it, just cick ok on the next box.
~
WARNING!
NEVER check all of the boxes in the save menu, as it will screw up your map (unless told otherwise). The ones already selected are the ones that you have made changes to, so you shouldn't need to check any more boxes.
~
Now, its time to add statics (objects) to our map!
Using The Level Editor
Using the drop down box, select LevelEditor. First things first, is loading the content. Go to "Mod > Mod Manager..." and click the editor content tab at the top. check ALL the boxes on this page, to look like this:
Click ok when they are all selected, and wait for it to load them all.
Next is the scenery, the buildings etc. In the resources window, open up bf2 tree and select the following:
Then drag this into your map, and it should place a building into it (if the building is only visible at certain angles from the camera, save and close the editor, then reload it all again as it will sometimes do this after you have just painted onto it). Move the building to where you want it to go, using these two tools:
. they are simple enough to use, one moves the object selected, the other rotates it (a tip with the rotating tool, to rotate something exactly 90 degrees, right clk the circle). Continue to place down items from the bf2 objects tree into your map, until you have something you like.Now we will want to add some control points. Select the move tool and right click on to your map and select create control point. Name it, and create another two around your map (ignore the teams at the moment, we'l get back to that). Move them to the right places, and select the one you want as a neutral. Look in the tweaker bar, and change the value in team to 0. chnge the third CP to team 2 aswell. Now change the radius values to fit how you want them, i usually stick around 7-15.
Here is mine so far...
It aint that great, as i have just made it quickly.
Now, spawn points. These are simply made by right clicking near your chosen CP and clickng create spawn point. There is no need to name them really, just stick with the default name.
Now we have objects, CP's and spawn points! Next, vehicles. Create these by using the same method as createing a spawn point, right click and click create object spawner. You then get a list of all vehicles and such in the game that you put in, so select one, making sure that the army names before it are the armies that you want in your map. we will use "ME_US_Heavy_Jeep". The object will then show up, but it will be the wrong type for the CP (a vodnik will show up for a US flag) but dont worry, it wont look like this ingame. Place it in the right position, and place anymore if you want them.
Our map should now be basically completed!
If you would like to test it out, go ahead, but do these first:
1. Close the editor and open up this directory: C:\Program Files\EA GAMES\Battlefield 2\mods\bf2\Levels
2. Right click your level and go to properties
3. Un-check the read-only attribute, and apply it to all sub folders and files.
4. Click ok
5. Open the editor back up and load your map in the terrain editor
6. Activate all the heightmaps via trying to paint over the edges. There should eight altogther.
7. Go to "render > surrounding terrain > toggle draw all" and 8 squares should now be surounding your map. You can choose to paint these, or just lower them into the ground, and set a water level (set a water level by clicking the "your level" tab in the tweaker and clicking water settings. then change the water level) to cover em up.
8. Now click save, and make sure the "compiled detail and colour textures" box is checked.
9. Now click yes.
Now, to the right of the editor, find the button called "level settings". Press it to open up a box, and in the drop down box, change it to the right army (chinese or mec) that you want for your map. If you change it to MEC, you have to manually change the flag name to "flag_mec" (without quotations). Now click ok and save.
Now you should have completed your map 0.1, so go into terrain editor mode and go to "Terrain Editor > setLowDetailTexture". A box should show up now, and you must select defaultLowDetail.dds and click ok. Now save and get testing!
To test your map, open BF2, log in, click the multiplayer tab, and go to "create local". select your map,a nd click start server to bgin testing it.
If you followed this guide exactly, you should have now created a basic map, pat yourself on the back!
Stay tuned for my next guide, "Mapping, The Extra Bits" which will include stuff like minimaps, level settings, and other stuff.
After that i will make another guide called "Mapping, Revenge Of The Sith: Expert tips".
Thanks for reading!
*EDIT*
If anyone has any questions concerned with mapping, PM me or just reply here and il help you out as best as i can.
*EDIT*
the next guide in the series: http://forums.bf2s.com/viewtopic.php?id=37981
Last edited by FFLink13 (2006-10-03 09:38:37)